This is an old revision of the document!
Accounting & Financial Reports
Explore how to generate accounting and financial reports with Chillhub.
Before using any accounting features in Chillhub, please ensure you’ve set up your Chart of Accounts, Account Rules, and Financial Periods by following this guide.
Journal: Detailed record of a business transaction over a period, using a double-entry system


General Ledger: Complete record of all journal entries organized by account.


Balance Sheet: Shows assets, liabilities, and equity at a specific point in time.


A/R Aging Report: Summarizes outstanding customer receivables by how overdue they are.


A/P Aging Report: Summarizes outstanding supplier payables by how overdue they are.


Debtor/Creditor Statement: Summary of outstanding amounts owed by customers (debtors) or to suppliers (creditors) over a selected period. |
Debtors/Creditors
- Log in to Chillhub App.
- Navigate the Accounts Chart page by selecting Menu → Accounting → Debtor or Creditor

- The following options are located on the toolbar
- Search: Allows you to search for specific data
- Refresh: Updates the current view by reloading the data
- Export to Excel: Enables exporting the current view data to an Excel file.
- Data Table:
- : View detailed statement for the selected debtor or creditor.
- : Record a payment and apply it to one or more outstanding invoices.
- Creditor or Debtor: Name of the customer (debtor) or supplier (creditor).
- Balance: Outstanding amount owed by or to the party.
Debtor/Creditor Statement
- Clicking icon on a Debtor or Creditor row opens a statement dialog showing detailed transactions for the selected customer or supplier.

- Creditor: The selected supplier whose statement is being viewed.
- Debtor: The selected customer whose statement is being viewed.
- From & To: Date range to filter the transactions.
- Fetch Data: Loads transactions for the selected creditor within the chosen date range.
- Export to Excel: Downloads the statement as an Excel file.
- Data Table for Creditor:
- : View or edit the linked document or transaction.
- Date: The date of the transaction.
- Payment Status: Shows the current payment status of the purchase invoice (e.g., paid, not paid, partial).
- Document: Purchase Invoice number, or Expense reference.
- Description: Indicates the transaction type (e.g., Invoice, Payment, Expense, Credit/Debit Note, or Manual Entry).
- Ref. No.: Displays the payment reference number or credit/debit note number.
- Debit: Amount reduced from the supplier’s payable balance.
- Credit: Amount added to the supplier’s payable balance.
- Data Table for Debtor:
- : View or edit the linked document or transaction.
- Date: The date of the transaction.
- Payment Status: Shows the current payment status of the sales invoice (e.g., paid, not paid, partial).
- Document: Sales invoice number.
- Description: Indicates the transaction type (e.g., Invoice, Payment, Credit/Debit Note, or Manual Entry).
- Ref. No.: Displays the payment reference number or credit/debit note number.
- Debit: Amount added to the customer’s receivable balance.
- Credit: Amount reduced from the customer’s receivable balance.
- View Document: Opens the full document in a separate view.
- Transactions with the same Description, Date and Reference Number (e.g. payment ref. no. or credit/debit note no.) are grouped together.
- Aging Summary is displayed at the bottom of the statement to show outstanding amounts grouped by how long they’ve been overdue.


Record Payment
- Clicking icon on a Debtor or Creditor row opens the Record Payment dialog to log a payment and allocate it across outstanding documents.
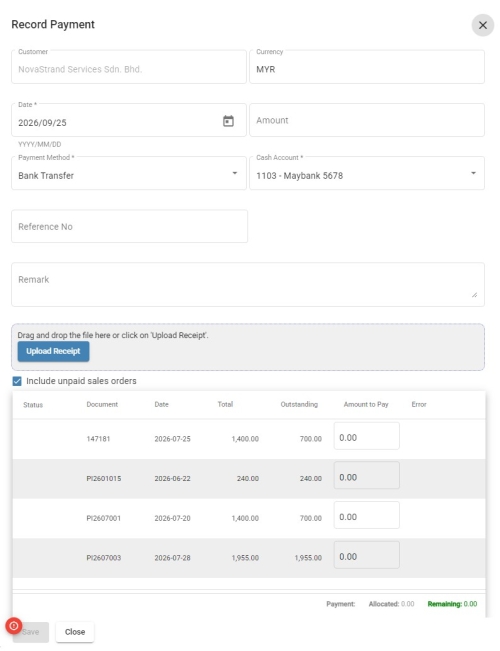
- Customer / Supplier: Name of the party the payment is being recorded for (read-only).
- Currency: Defaults to your base currency.
Enable the Multi-Currency add-on to select a foreign currency. - Date: The date the payment was made.
- Amount: The total payment amount received or paid.
If a foreign currency is selected, this field becomes Amount (Foreign), entered in the foreign currency, with the equivalent base-currency Amount shown alongside it. - Exchange Rate (foreign currency only): The exchange rate used to convert the payment to your base currency.
- : Fetch the latest exchange rate automatically.
- Forex Gain/Loss (foreign currency only): Automatically calculated based on the difference between each allocated document's original billing exchange rate and this payment's exchange rate.
- Account (Forex Gain/Loss) (foreign currency only): The account used to post the forex gain or loss.
Defaults automatically based on Account Rules, but can be changed manually. - Payment Method: Select how the payment was made (Cash on Hand, Bank Transfer, Credit Card, Debit Card, E-Wallet, or Cheque).
- Cash Account: The account the payment is deposited into or paid from.
Defaults automatically based on the selected Payment Method and Account Rules, but can be changed manually. - Reference No.: Payment reference number (e.g. bank transaction reference, cheque number).
- Remark: Any additional notes about the payment.
- Attachment: Upload supporting documents (e.g. payment slip, receipt) as image or PDF files, up to 5MB each.
Uploaded files can be previewed, viewed, or removed before saving. - Include Sales Orders checkbox (Debtor mode only): Include unpaid Sales Orders, in addition to unpaid Invoices, in the allocation table below.
- Allocation Table: Lists all outstanding invoices (and, depending on party type, sales orders or expenses) for the selected customer/supplier.
- Entering an Amount automatically distributes the payment across outstanding items, earliest first, until fully allocated.
- Amount to Pay for each row can be manually adjusted to change how the payment is allocated.
- Document: The invoice, sales order, or expense reference.
- Date: The date of the document.
- Total: The original total amount of the document.
- Outstanding: The remaining unpaid balance of the document.
- Amount to Pay: The portion of this payment being allocated to the document.
- Status / Error: Shows the save status of each allocated item, and any error encountered, once submitted.
- The table footer shows Payment (total payment amount), Allocated (total allocated so far), and Remaining (unallocated balance) — shown in red until fully allocated, green once balanced.
- Click Save to submit the payment.
Only enabled once the Remaining balance is exactly 0 and at least one document has been allocated. - Click Close to exit without saving.

